Essential Equipment for Riding
Bridles and Reins
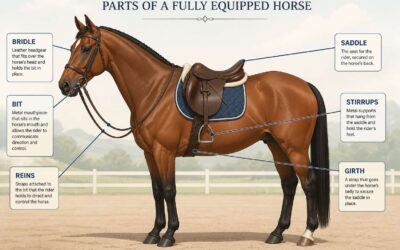
South Africa’s equestrian heritage runs deep, from polo fields in the Cape Winelands to trail rides through the Karoo. The bridle remains the most intimate piece of horse tack 101, translating the slightest finger movement into a signal the horse can read. A well-fitted headpiece, throatlatch, and browband work as a unit, but the reins carry the most direct communication.
The materials matter. Leather reins offer a supple, traditional grip, while rubberized options provide security in wet conditions. Consider the components:
- The crown piece sits behind the ears
- The cheekpieces connect to the bit
- The noseband adds control and refinement
Each element must align with the horse’s conformation. The bit rests comfortably on the bars of the mouth, not clattering against teeth. For novice riders, a snaffle bridle with split reins offers simplicity and safety. For the competitive rider, a double bridle with weymouth and bradoon provides precision at higher levels. Bridles and reins enable that subtle exchange between rider and horse, built on trust and years of practice.
English vs Western Saddles
Choosing between English and Western saddles comes down to the job at hand. English saddles are lightweight and close-contact, built for jumping or dressage. Western saddles distribute weight over a larger area, ideal for long hours of ranch work or trail riding.
The essential equipment differs dramatically. An English saddle uses a girth to secure the saddle, while a Western saddle relies on a cinch system. Stirrup leathers and fenders also vary, affecting leg position and rider security. For horse tack 101, understanding these basics prevents discomfort for both horse and rider.
- English saddles often have a forward flap and smaller skirt
- Western saddles include a horn and wider fenders
I’ve learned that fit rules everything. A well-matched saddle and pad make any ride safer.
Saddle Pads and Girths
The saddle pad sits between the horse’s spine and the saddle’s hard tree. Without a proper pad, friction causes sore spots and bucks. In South Africa’s heat, fleece absorbs sweat but needs frequent washing. Gel pads stay cooler but may slip. Felt wicks moisture yet wears out fast. For horse tack 101, match the pad to your climate and horse’s back shape.
Girths keep the saddle from rolling sideways. In my experience, a leather girth with elastic ends distributes pressure evenly. Neoprene girths handle dusty trails and rinse off easily. Fit trumps material. A tight girth brings girthiness; a loose one invites a saddle slip. I inspect the billet straps every tack up. A snapped strap mid-canter is a memory you do not need!
- Thick padding for high withers
- A breathable weave for humid days
- Attachments for secure placement
The right pad and a snug girth define the essential equipment beyond the saddle.
Stirrups and Fenders
Your entire weight rests on a strip of leather. The fender, that long panel hanging from the saddle tree, transmits leg cues and absorbs shock. I have watched riders struggle with stiff fenders that never break in, and I have seen stirrup leathers stretch unevenly after one Highveld summer.
The stirrup itself deserves scrutiny. Wide treads spread pressure across the ball of the foot. Narrow treads concentrate force and create foot fatigue. Western fenders are broad and fixed. English stirrup leathers adjust and weigh less. For horse tack 101, match the tread to the rider’s boot sole and the discipline.
A worn fender creaks and twists. That twisting pulls the stirrup inward and tilts your ankle. In horse tack 101, the stitching where the fender meets the stirrup bar deserves inspection. Heat and dust are relentless on leather, so check for cracked seams! Consider these factors when selecting replacements:
– Tread width for foot comfort
– Material durability under UV exposure
– Quick-release safety features
Understanding Bits and Bitting
Snaffle Bits
A snaffle bit is often misunderstood. Many riders assume its jointed mouthpiece signals a harsh tool, yet the opposite is true. In the right hands, it is a fundamental piece of horse tack 101 that promotes clear, direct communication. The action is simple: pressure on the reins transfers to the corners of the mouth, encouraging the horse to soften and yield. This is not about force, but about finesse.
The design creates a seesaw effect on the bars of the mouth, the lips, and the tongue. When you lift one rein, the mouthpiece pivots, applying pressure to the opposite side. To understand how this works, you need to consider the primary points of contact:
– The tongue, which receives pressure from the port or joint.
– The bars of the mouth, where the metal rests on the gums.
– The corners of the lips, where the rings sit.
A common myth is that the Western curb bit is softer because it has no joint. This is a dangerous assumption. The leverage from a shank can multiply pressure significantly. A snaffle, by contrast, offers one pound of pressure for every pound you apply. This direct ratio makes it an excellent schooling tool. The versatility in mouthpieces, from french links to slow twists, allows you to fine-tune the feel, making it a cornerstone of any serious rider’s kit.
Curb Bits
A single ounce of pressure on a curb rein becomes three ounces at the mouthpiece. That is the mathematics of leverage!
The curb bit operates on a different mechanical principle than the snaffle. While the snaffle offers a direct one-to-one ratio, the curb uses shanks to multiply force. The mouthpiece often includes a port, which creates room for the tongue while applying pressure to the bars and palate. The curb chain rests against the chin groove, producing a balanced squeeze.
Key components of a curb bit:
- Shank length determines leverage
- Port height affects palate pressure
- Curb chain engages the chin groove
- Purchase influences balance
Understanding these mechanics is essential to horse tack 101. A curb bit demands a steady hand. The signals are amplified. A rider who cannot maintain soft contact will cause discomfort. This is why curb bits appear in advanced disciplines. They are precision instruments, not punishment tools. In horse tack 101, the curb bit represents the advanced lesson.
Bitless Alternatives
A horse who resists the bit may respond differently when the mouth is left untouched. Bitless alternatives shift pressure to the poll, nose, or chin. Understanding these tools forms a core part of horse tack 101.
- Mechanical hackamores multiply force through shanks.
- Side pulls attach to the noseband with no leverage.
- Crossunder patterns use a figure eight design.
Each system demands distinct rein handling. Riders must learn to release before the horse yields. Bitless bitting changes the rider’s rein aids, prioritizing comfort and clarity. The choice depends on the horse’s anatomy, training level, and the rider’s goal.
Choosing the Right Bit
A bit is a communication device, not a control mechanism. When you close your fingers on the rein, the mouthpiece presses against the bars of the horse’s mouth, the tongue, and the palate. The horse’s response is a reaction to that pressure. The palate, or roof of the mouth, is particularly sensitive. A thick or incorrectly shaped mouthpiece can cause bruising or discomfort, leading to head tossing or resistance. This understanding is the core of horse tack 101.
The anatomy of the mouth dictates the choice of the mouthpiece. A horse with a thick, fleshy tongue may need a thinner mouthpiece with a port to allow tongue space. A horse with a low palate cannot accommodate a thick port. The fit of the mouthpiece is as important as the fit of a saddle. A well fitted bit allows the horse to salivate and relax its jaw.
Selecting the right bit also involves the rings or cheeks. The rings affect how the mouthpiece acts in the mouth. A simple ring, like an O ring, offers direct pressure. A bit with a cheekpiece that extends below the mouthpiece creates leverage, which multiplies the pressure from the rein. The length of the lever changes the feel.
Consider these steps when evaluating a bit for your horse:
1. Assess the horse’s current behaviour in the existing bit. Look for signs of anxiety or pain.
2. Inspect the horse’s mouth for any wounds or calluses.
3. Test the bit width, ensuring it is not pinching the corners of the mouth.
4. Evaluate the action of the bit by using a rein aid and observing the horse’s response.
The rider’s hands play a pivotal role in the bit’s function. A quiet, independent hand allows the horse to find comfort on the contact. The rein aid should be a squeeze, not a pull. The release of the aid is what rewards the horse. The interaction between the rider’s hand and the horse’s mouth is a conversation.
The discipline often dictates the standard style of bit. However, the individual horse’s conformation and training should override tradition. A horse working in a dressage test may require a double bridle, but a young horse needs a simple, mild snaffle. The rider’s skill level factors into the choice, as some bits require a delicate, educated hand. The ultimate goal is a horse that accepts the contact and moves with confidence, and finding that begins with the right equipment within the broader scope of horse tack 101.
The mouth is a sensitive area, and the bit is a means to communicate intent. The wrong bit creates a barrier. The right bit feels like an extension of the rider’s aids, a subtle and clear signal. The soft tissue of the mouth deserves respect.
Common Bit Materials
Your horse cannot tell you which bit it prefers. This is a shame, because its opinion on metal matters. A horse will accept a cheerful stainless steel snaffle with the same stoic grace it reserves for a farrier, yet the material of the mouthpiece alters the conversation entirely. This is a core part of horse tack 101. Sweet iron is the horse world’s answer to a warm cookie. It oxidizes, creating a taste that encourages salivation and a softer jaw. Stainless steel is the reliable, if bland, workhorse. It is durable and easy to clean, but consider that it gets cold in a Cape winter, a sensation no horse appreciates.
The material affects the horse’s response to pressure. A thin, harsh metal sends a sharp signal. A thicker, softer rubber or plastic mouthpiece diffuses the aid for a green mouth. Copper, often welded into the mouthpiece, promotes chewing and relaxation. Some materials are a marketing gimmick, wearing poorly.
– Sweet iron: rusts, tastes pleasant, promotes saliva.
– Stainless steel: strong, hygienic, neutral.
– Copper: conductive, encourages a busy mouth.
– Rubber or synthetic: thick, forgiving, for young horses.
Selecting a mouthpiece is a game of nuance. The bitting process is a series of experiments, not a single purchase. As we continue through horse tack 101, remember that the material is the translator for your aids. Choose a material that speaks softly. The horse’s willingness to soften is the only metric that matters. Ignore the color of the metal and watch the horse’s expression. A quiet, chewing mouth tells you everything.
Halters and Lead Rope Basics
Types of Halters
In South Africa, where horses often stand tied to gum trees under a hard sun, the halter is usually the first piece of horse tack 101 a new owner purchases. It is a simple tool, yet it handles the daily reality of leading, tying, and grooming. The lead rope converts your hand signals into pressure that a horse understands.
You will find three primary types of halters when you shop. Each one fits a different moment in your routine.
- Nylon halters are durable and easy to rinse off after a dusty ride.
- Leather halters look refined and break under extreme pressure, which protects a panicked horse.
- Rope halters place more precise pressure points, aiding advanced groundwork sessions.
Understanding the materials matters deeply. In horse tack 101, you learn that the Highveld’s dry air can crack leather, while coastal humidity makes nylon stay damp and heavy.
Proper Halter Fit
A halter that hangs too low invites a horse to paw at the ground and catch a hoof. One that pinches the cheekbones can turn a gentle groom into a head-tossing negotiation. Proper fit is the quiet contract between handler and horse, and it begins with observation.
The noseband should sit roughly two fingers below the cheekbone, with the crown piece settled behind the ears. The lead rope, clipped to the brass ring, should hang without dragging through dust.
- Noseband pressure: two fingers, no more.
- Crown piece: snug, not binding.
- Throat latch: one fist of clearance.
This is the foundation of horse tack 101. A horse that trusts its halter moves freely into pressure, which makes every subsequent lesson safer.
Lead Rope Materials and Lengths
Most handlers grab the nearest lead rope without thinking. That is a mistake. The material and length shape how you communicate with the horse. That is the core of horse tack 101.
Nylon leads are tough and easy to clean, but they can burn your hands if the horse pulls. Cotton offers a softer grip, though it collects moisture and wears faster. Rope leads, made of polypropylene or yachting rope, provide weight and clarity. A heavier lead transmits subtle cues to the halter.
Length matters! Pick by job:
- A 6 to 8 foot lead suits daily handling and close control.
- A 10 to 12 foot lead gives room to lead at the shoulder or tie short.
- Anything longer belongs to lunging, not parading.
The right lead makes handling effortless. The wrong one makes it miserable. That is horse tack 101.
Safety Knots and Quick Releases
Most people tie a horse with the same knot they use for a boat. That is a recipe for disaster. A horse that spooks and pulls back needs a knot that gives, not one that locks tight. The quick release knot is the only knot you should use. It takes three seconds to tie and one second to undo.
Here is the method:
- Drape the lead over the rail or post.
- Wrap the working end around the standing part.
- Pass the end through the loop you just created.
- Pull it snug. Leave the tail long enough to grab.
The test is simple. If you cannot untie it with one hand while wearing gloves, it is wrong. A proper quick release allows the horse to break free with a hard pull. The loop slips, and the line goes slack.
Safety knots are not just for the barn. They matter on the trail and at competitions. A horse tied to a trailer with a fixed knot can panic and injure itself. The quick release protects the horse and everyone nearby. That is the difference between a smart handler and a lucky one.
The same principle applies to the halter itself. A properly fitted halter, combined with a dependable lead and a safe knot, completes the system. This is horse tack 101.
Catching and Leading Techniques
The average horse can outrun a human in three strides. Catching one is not about speed. It is about the quiet signals you send before you reach for the halter. Turn your approach into a curve, keep your hands low, and let the horse see you coming from the shoulder. A relaxed approach reads as safe.
When you are close, let the horse sniff your hand. Raise the halter slowly, guiding the crown piece behind the ears without rushing. The noseband settles over the muzzle and the buckles fasten with no fuss.
Leading works the same way. Stand beside the shoulder and take up the slack in the lead rope.
- Apply steady pressure toward the direction of travel.
- Release the moment the horse steps forward. That release is the reward!
- Keep your pace steady and your hand quiet.
This pressure and release pattern is a core skill in horse tack 101.
Tack Maintenance and Care
Cleaning Leather Tack
Every ride deposits sweat, grime, and microscopic dirt onto your leather. If you ignore it, the fibres degrade silently. I’ve watched neglected saddles crack in under a year. This is why leather care sits at the core of horse tack 101. Start with a damp cloth to wipe away surface residue. Then use a mild saddle soap and a soft sponge, working in small circles.
- Avoid soaking the leather. Excess water pulls out natural oils.
- Let soap sit briefly, then remove it with a second damp cloth.
- Dry away from heat or sunlight.
Finish with a quality conditioner. Supple leather flexes without losing shape. Dry leather snaps without warning. The entire process takes ten minutes. A fixed habit keeps your tack functional for decades.
Conditioning and Oiling
Conditioning is where leather care transforms from mere cleaning into true preservation. A saddle that receives regular conditioning responds like a well-treated hide, supple and forgiving under the rider’s weight. The key is understanding the difference between conditioning and oiling, a distinction many overlook in their journey through horse tack 101.
Conditioners penetrate the leather fibres to replace the natural oils lost during riding and cleaning. I have found that a high quality balm or cream, applied sparingly, works best for most South African climates. Our harsh sun and dry winters demand a product that feeds the leather without leaving a greasy residue that attracts dust.
Oiling serves a different purpose. Neatsfoot oil and similar products provide a heavier dose of nourishment for dry, brittle tack or new leather that needs softening. Use oil sparingly and only when needed, perhaps once a season or when the leather feels stiff.
Before applying any conditioner, ensure the leather is completely dry. Warm leather from a recent ride will absorb product unevenly, leaving the surface sticky while the interior remains dry. Work the conditioner into the leather using small, circular motions with your fingertips or a soft cloth.
Allow the product to absorb fully before using the tack.
A thoughtful approach to conditioning keeps every component, from bridles to saddles, functioning as intended. This routine sits at the heart of horse tack 101, ensuring your equipment remains safe and dependable for years of riding across our beautiful landscapes.
Inspecting Stitching and Hardware
Stitching holds a saddle together under forces that would snap lesser materials. I run my thumb along every seam, feeling for raised threads or gaps where the needle has pulled free. Sun-bleached thread loses strength quietly, and a broken stitch on a girth strap rarely announces itself before trouble begins.
Hardware deserves the same scrutiny. Check buckles for play, rollers for smooth movement, and rivets for hairline cracks. The points where leather meets metal carry the heaviest load, so I focus my attention there.
- Buckle tongues and their spring tension
- Stitching around keeper loops and billet straps
- Rust pitting on rings and dees
Regular inspection of these points forms the core of horse tack 101. A failing stitch or a cracked buckle gives warning signs well before the component gives way, provided you look for them.
Storing Tack Properly
A tack room’s smell warns you before your eyes do. Sour leather and a musty tang mean moisture has already set in. On a humid Durban morning, that process begins within hours. Proper storage belongs at the heart of horse tack 101.
Saddles need a rack that supports the tree, never the pommel or cantle. Bridles hang with the crown piece supported so the leather keeps its shape. I avoid concrete floors, since moisture rises through them and attacks leather from below.
Some tack rooms punish mistakes:
- Sunlight through a window fades leather and dries it out
- Closed cupboards trap moisture and encourage mildew
- Heat sources, like geysers, crack stitching
Airflow matters more than most owners realise. A stable aisle with a gentle breeze stops the stagnation that breeds rot. Breathable cotton dust sheets appear in every horse tack 101 discussion, yet few tack rooms actually use them.
Extending the Life of Synthetic Tack
Synthetic tack built from biothane or reinforced webbing rewards owners who understand its simple maintenance rhythms. This gear was never created to mimic leather, it was built for abuse. Scrub it with warm water and a soft brush after a dusty ride and you extend its life by years. These materials resist rot when kept out of direct sunlight. That ultraviolet light, not moisture, is the real enemy of quality synthetics.
The checklist for long-term care is straightforward.
– Rinse every buckle and keep dirt from grinding into the stitching.
– Wipe down with a damp cloth before hanging.
– Store synthetic bridles away from windowsills and UV exposure.
– Check for brittle spots or fraying where hardware meets webbing.
Wash stubborn grime with dish soap and warm water. Unlike leather, there is no saddle soap, no oils, no conditioning ritual. Water dissolves sweat and dirt quickly enough. This simplicity makes synthetic gear an underrated choice within any horse tack 101 discussion, particularly for coastal riders who face persistent humidity every week of the year.
Fitting Tack to Your Horse
Measuring for a Saddle
A saddle that fails to fit correctly can turn a willing partner into a resentful companion, and it is the most common reason for behavioural resistance under saddle. Before you even place the saddle on the horse’s back, you must assess the shape and movement of the shoulder and ribcage. A cheap saddle on a perfectly fitting tree is a better investment than an expensive show saddle that pinches at every stride. The goal is to achieve even pressure distribution across the weight-bearing area, which lies behind the shoulder blade.
Begin by placing the saddle without a pad onto the horse’s bare back, after a thorough brushing to remove any dirt that could cause rubbing. Use a flexible curve to trace the contour of the horse’s back directly behind the shoulder blade, then transfer that shape to a piece of paper. This provides a literal map of the withers.
You are looking for three critical points of contact:
1. The pommel clearance, which should allow for at least three fingers to slip between the withers and the gullet.
2. A uniform channel of light along the entire length of the spine, with the panels not bridging or rocking.
3. Points of the tree that do not dig into the trapezius muscle behind the shoulder.
Check the saddle’s balance from the side. The deepest point of the seat should be level, not tilted forward or backward. What looks perfectly balanced from the mounting block can be a different story entirely from the ground. A correctly fitted saddle holds the rider’s weight away from the spine, transferring it to the muscles and ribs. If the tree is too narrow, it perches high; if too wide, it rocks forward and puts pressure on the shoulders, restricting the horse’s ability to use its forehand effectively. This nuanced relationship between tree angle and muscle development is central to understanding horse tack 101, as the horse’s shape inherently changes with fitness and age.
Checking Bridle Fit
Many riders obsess over the saddle while ignoring the bridle, yet a misaligned headpiece can mute every aid you give. In horse tack 101, bridle fit is the quiet contract between your hands and the horse’s mouth. The poll is a cluster of nerves, and any twist in the leather registers as tension.
Begin with the headpiece. It should sit flat behind the ears, not folded or pinching. The browband should clear the ears by one finger. Check cheekpieces for equal length; the bit should rest at the corner of the lips, creating one wrinkle at the corner.
- Throatlatch: four fingers of space, snug but not tight
- Noseband: two fingers under the jawbone
- Buckles: aligned with the cheekbone, not pressing on it
Adjust each strap slowly, one at a time. A balanced bridle distributes pressure evenly, allowing subtle rein signals. This precision is the essence of horse tack 101 for any rider aiming for harmony.
Avoiding Pressure Points
Over 70% of horses in regular work exhibit measurable muscle asymmetry directly attributable to ill fitting equipment. This statistic should unsettle any rider who has ever cinched a girth without thought. Pressure points are not merely a source of discomfort. They create a physiological response that alters the horse’s gait, posture, and even his willingness to move forward.
The skeletal structure of the horse is unforgiving. The spine, the withers, and the scapula offer little cushioning. A saddle tree that rocks forward, or a girth that sits too high in the armpit, will bruise tissue and compress nerves. When fitting tack, you must consider the dynamic horse, not the static one. A clean trot will shift the shoulder blades backward by several centimetres, so a saddle must allow for this scapular rotation.
Here are the primary zones where pressure points commonly develop:
– The fossa, or the soft depression behind the shoulder blade, where the girth and saddle flap interact.
– The trapezius muscle, which runs along the topline and is easily bruised by a rigid tree.
– The sternum, where a misaligned girth buckle can create a concentrated focal point of pain.
You must learn to read the horse’s physical feedback. Look for white hairs, which often indicate old scars, or swollen, heat sensitive areas after a ride. The motion of the saddle is also a tell. If the saddle rocks, slides, or jumps off the midline, it is an active agent of damage. A palatable fitting session involves slow adjustment, lunging with the equipment, and rechecking clearance. The horse’s skin is a sentient organ. A modern approach to horse tack 101 involves thermal imaging to detect inflammation that cannot be seen with the naked eye, offering a precise map of where pressure is being applied. Symmetry in your tack placement is the ultimate goal.
Signs of Poor Fit
A horse will rarely stand still and announce that its saddle is causing misery. Instead, the animal communicates through a subtle lexicon of evasion and resistance. A sudden refusal to stand for mounting, or a new habit of tail swishing during the canter, are often the first chapters in a story of poor fit. These behavioural changes are the equine equivalent of a polite but firm complaint.
Physical evidence often follows these behavioural cues. You might notice dry spots under the saddle area, which indicate where the tree is bridging and failing to distribute weight evenly. Similarly, a horse that becomes cinchy or pins its ears when the girth is tightened is not being difficult. It is anticipating pain, a sign that the sternum or ribcage has been previously compressed by a misaligned strap.
– White hairs in the saddle area that were not there at the start of the season.
– A dip or hollowing of the muscles alongside the withers.
– Uneven sweat patterns, where one side is soaked and the other is dry.
– A reluctance to bend to one specific side during lateral work.
These are the clues left on the animal’s body. Over time, a poorly fitted saddle will cause the horse to alter its core musculature to avoid the discomfort. This compensation creates a crookedness that is often misdiagnosed as a training issue. The rider perpetuates the cycle, applying stronger aids to push a horse that is physically guarding itself. A thorough tactile check after removing the tack, running a flat hand over the back to feel for heat or flinching, is an essential part of the evaluation. The foundation of horse tack 101 is not the leather or the stitching, but the silent conversation between the tree and the living spine beneath it.
When to Seek Professional Fitting
Knowing when to call a professional fitter is a central part of horse tack 101. A saddle that shifts during work, or a horse that shows new resistance after months of calm behaviour, warrants expert eyes. You can check symmetry and levelness yourself, yet the flocking inside the panels and the tree’s angle require trained assessment.
Consider professional fitting in these cases:
- A new horse or one whose body condition has shifted
- Any fall, injury, or lameness involving the back
- Recurring girth sores despite careful pad adjustments
A horse’s back changes with age, fitness, and season. Owners who ignore those changes risk muscle atrophy and behavioural decay. I have seen horses labelled stubborn simply because their tack no longer matched their shape. A professional fitting costs far less than veterinary care.

0 Comments